The first time I tried how to wire wrap crystals, I picked a chunky smoky quartz from my desk, grabbed whatever wire I had, and… watched it slide out like a bar of soap. That’s the moment wire wrapping stopped feeling like “crafty magic” and started feeling like a calm little engineering puzzle. If you’ve ever held a crystal and wondered, How do I turn this into jewelry without drilling it?—this tutorial is for you.

What wire wrapping is (and why it works for crystals)
How to wire wrap crystals is the method of securing a stone using tension, structure, and friction—no glue, no holes required. A good wrap behaves like a “cage” that hugs the widest points of the stone and locks at the top with a bail (the loop your chain goes through). The better the contact points, the more secure it is.
Most beginners struggle because of one of these issues:
- Wire is too soft or too thin for the stone’s weight
- The “frame wires” aren’t anchored before adding decorative coils
- The crystal has no “waist” (a point for the wire to catch)
If you’re using natural stones (like StarryBead’s 100% natural crystal pieces with authenticity certificates), shapes vary a lot—so learning principles matters more than memorizing one pattern.
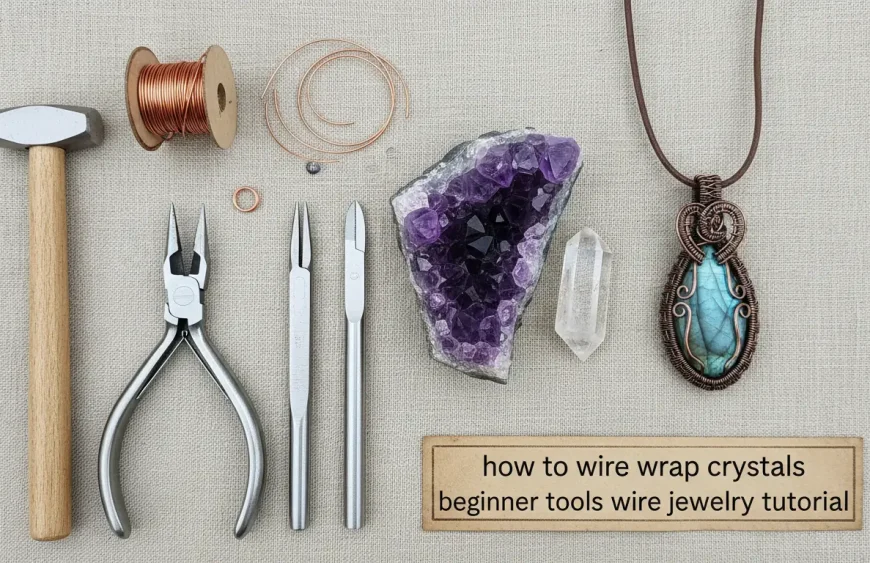
Tools + materials you’ll actually use (beginner-friendly)
You can start simple, but don’t skip the basics—the right wire and pliers make how to wire wrap crystals feel 10x easier.
Essential tools
- Chain-nose pliers (grip and bend cleanly)
- Round-nose pliers (make loops and bails)
- Flush cutters (clean cuts; avoid sharp “spikes”)
- Nylon-jaw pliers (optional, great for straightening without scratching)
- A file or cup burr tool (to smooth cut ends)
Wire choices (quick guide)
- 20–22 gauge (frame): the “skeleton” that holds the crystal
- 26–28 gauge (weaving wire): wraps, coils, and decorative binding
- Materials: copper (easiest to learn), sterling silver (beautiful, pricier), gold-filled (durable finish), stainless steel (harder to bend)
If you’re making gifts or daily-wear pieces, I prefer starting with dead-soft copper to master tension, then upgrading to sterling or gold-filled once your wraps are consistent.
| Use | Recommended gauge | Best for crystal types | Pros | Common beginner mistake |
|---|---|---|---|---|
| Frame wire | 20–22g | Quartz points, small clusters, tumbled stones | Holds shape well; easy to form clean frames | Overworking the wire (too many bends) causing kinks/weak spots |
| Weaving wire | 26–28g | Smooth tumbled stones, small drilled beads, cabochons | Flexible; tight wraps; neat finishing and detail | Pulling too tight and snapping the wire or warping the frame |
| Bail/loop reinforcement | 18–20g | Heavier points, thicker tumbled stones, pendants needing strong bails | Stronger hanging point; reduces bail distortion | Making the loop too small/off-center so the pendant hangs crooked |
Pick the “right” crystal for your first wrap
For your first project, choose a stone that helps the wire “catch.”
Easiest crystals to start with
- Crystal points (clear quartz, amethyst points)
- Slightly irregular rough stones (citrine chunks, smoky quartz)
- Tumbled stones with a subtle “belly” (jasper, agate)
Trickier at first (still possible)
- Very smooth spheres (no edges to grip)
- Flat slippery cabochons without a frame (needs a different technique)
- Super heavy stones (require thicker frame wire and more anchors)
If you want a beginner win, start with a medium-sized point—your wire can grip under the shoulders and lock near the tip.
Step-by-step: Simple wire-wrapped crystal pendant (no drill)
This is a classic “cage wrap” that works for many points and rough crystals. I’ll describe it so you can adapt it to different shapes—because crystals never come in identical sizes.

1) Measure and cut your frame wires
Cut 3 lengths of 20–22g wire.
- Length rule: crystal length × 3 (plus extra for the bail)
- Align wires and straighten them as best you can
- Keep the ends even—clean starts make clean wraps
2) Bind the bundle (your first “anchor”)
Using 26–28g weaving wire:
- Leave a 3–4 inch tail (don’t trim yet).
- Wrap 8–12 tight coils around all three frame wires.
- Push coils snugly together, then trim the weaving wire neatly.
This anchor becomes your “spine” and prevents the frame from shifting later.
3) Create the base cradle
Fan the three frame wires slightly and bend them into a shallow U-shape. Test-fit the crystal so the widest part sits in the cradle. The goal is simple: the crystal shouldn’t fall through even before you fully tighten.
- If it slips, deepen the curve or move the anchor lower.
- If it tilts, adjust your wire spacing so the contact points are balanced.
4) Lock the crystal in place (the part that makes it secure)
Hold the crystal firmly against the frame and bring the side wires up around it. Cross the outer wires over the front (or back) and pull them snug—snug, not crushing.
A practical tension test I use:
- Shake gently over a towel.
- If the crystal shifts more than 1–2 mm, add another locking cross or tighten the cradle.
5) Bind again near the top
Wrap weaving wire around the frame wires near the top of the crystal (usually just above its “shoulders”). This second binding is what stops the crystal from sliding downward over time.
6) Make the bail (hanger loop)
Gather the frame wires at the top:
- Use round-nose pliers to form a loop (bail).
- Wrap the remaining wire ends around the neck of the bail 2–4 times.
- Trim ends and file them smooth so nothing scratches skin.
If you want a more “finished jewelry” look, add a small bead or spiral detail before trimming.
7) Final tidy + comfort check
- Tuck all cut ends inward (no sharp points)
- Press coils down with chain-nose pliers
- Rub your finger along every edge (your skin is the best quality control tool)
That’s the core of how to wire wrap crystals—frame, anchor, cradle, lock, bail, finish.
Common mistakes (and fast fixes)
Wire wrapping is forgiving, but these problems show up constantly—especially in first attempts.
- Crystal keeps sliding out: your wrap needs a “waist catch.” Add a lower cradle curve or cross-lock under the widest part.
- Wire looks messy: your coils aren’t seated. Use your pliers to push wraps together after every 5–6 turns.
- Bail is crooked: the wires weren’t centered. Before looping, align the bundle and check from the front.
- Ends poke skin or snag hair: trim flush and file. If you can feel it, it will annoy you.

Three easy variations once you learn the base wrap
Once you’re comfortable with the steps above, you can keep the same structure and change the style.
- Spiral side details
Turn the outer frame wires into spirals on the front for a more ornate look. - Weaving pattern upgrade
Use a 2-wire figure-eight weave across the front for texture and strength. - Double-bail for heavier crystals
Use thicker wire (18–20g) for the bail so the pendant hangs straight and lasts longer.
This is where crystal personality shines—try amethyst for a dreamy vibe, black tourmaline for a bold grounded look, or citrine for bright “sun-on-your-skin” energy.
Watching it helps: a beginner video to follow along
If you learn best by seeing the hand positions, watch a simple beginner wrap and pause often while you work.
5-Minute Beginner Wire Wrapping Tutorial | Labradorite Stone with Copper Wire
Safety + care (so your wrap stays beautiful)
Wire jewelry is durable, but it’s not indestructible.
- Remove before showering/swimming (chemicals can tarnish and weaken finishes)
- Store in a dry pouch to reduce oxidation
- If your crystal is softer (like kyanite), avoid rough impact and hard brushes
If you’re building pieces to wear daily, consider higher-quality wire (sterling silver or gold-filled) and smooth every cut end—comfort is craftsmanship.
Trusted resources for deeper technique learning
If you want to go beyond the basics of how to wire wrap crystals, these are solid references:
- Kernowcraft’s guide on how to wire wrap a rough crystal
- Rio Grande’s jewelry-making resource library at Rio Grande Jewelry Supply
- Wire gauge and jewelry wire basics from Fire Mountain Gems
Conclusion: your first wrap won’t be perfect—and that’s the point
When I look back at my earliest attempts at how to wire wrap crystals, the wires weren’t symmetrical and the bail leaned a little left—but the crystal held, and the piece felt mine. Wire wrapping is one of those skills where your hands learn faster than your brain, and every wrap teaches you something new about tension, balance, and patience.
FAQ: How to wire wrap crystals
1) What wire gauge is best for wire wrapping crystals?
Most beginners do best with 20–22 gauge for the frame and 26–28 gauge for weaving.
2) How do you wire wrap crystals without drilling holes?
Use a cage wrap: build a frame, create a cradle under the widest part, lock the sides, then form a bail at the top.
3) What’s the easiest crystal shape to wire wrap?
Crystal points and slightly irregular rough stones are easiest because the wire can “catch” on natural contours.
4) Why does my crystal keep falling out of the wrap?
Usually the cradle is too shallow or the lock point sits above the widest part. Add a lower catch and tighten in small adjustments.
5) Can I wire wrap tumbled stones?
Yes—choose a tumbled stone with some “belly” (a widest point) and add extra cross-locks for grip.
6) How do I stop sharp wire ends from poking?
Use flush cutters, tuck ends inward with chain-nose pliers, and file any exposed tips until smooth.
7) Is copper wire okay for crystal jewelry?
Yes—copper is excellent for learning. If you want less tarnish, store it dry and consider sealing or upgrading to sterling/gold-filled later.