The first time I tried wire wrapped gemstones, I thought the “messy charm” was part of the style—until I flipped the pendant over and saw the back looked like a tiny wire storm. If you’ve ever held a pretty crystal in one hand and a coil of wire in the other wondering, Where do I even start?, you’re in the right place. Clean wraps aren’t about expensive tools; they’re about planning your “spine,” keeping tension consistent, and finishing like a pro. Let’s turn your first wire wrapped gemstones project into something you’ll actually want to gift (or wear daily).

Why Wire Wrapped Gemstones Feel “Different” (and Why People Love Them)
A good wire wrap is both engineering and storytelling: it holds a stone securely without glue, while showing off the gem’s color and texture. In wellness jewelry, that matters—especially when customers want a piece that feels personal, intentional, and long-lasting. At StarryBead, we see this most with crystals like Amethyst, Citrine, and Clear Quartz because the wrap can frame the stone without hiding it.
For beginners, wire wrapped gemstones also have a low barrier to entry:
- No soldering required for classic wraps
- You can start with simple stones and improve fast
- Small technique upgrades (tension, symmetry, finishing) create big visual gains
Tools + Wire Choices That Make Clean Wraps Easier
When wraps look “muddy,” it’s usually the wire gauge or wire temper—not your hands. I learned this after switching from random craft wire to consistent jewelry wire and watching my wraps instantly look more intentional.
Core tools (beginner-friendly):
- Chain-nose pliers (for tight bends and gripping)
- Round-nose pliers (for loops and curves)
- Flush cutters (clean wire ends—huge for comfort)
- Optional: nylon jaw pliers (to straighten wire without marking it)
Wire (simple starter setup):
- Base wires: 20–22 gauge (structure)
- Weaving wires: 24–28 gauge (wrapping and decorative binds)
- Choose copper, sterling silver, or gold-filled based on budget and wear needs
| Item | Best For | Recommended Size/Gauge | Beginner Tip |
|---|---|---|---|
| Base wire | Main structure (frames, rings, wraps) | 20–22g | Start with dead-soft copper to learn bends; 22g is easier for small pieces. |
| Weaving wire | Wrapping, binding, decorative weaves | 24–28g | 26–28g is forgiving; keep tension steady and avoid over-tightening. |
| Chain-nose pliers | Gripping, straight bends, closing wraps | N/A (smooth jaws preferred) | Choose smooth jaws to reduce marring; use the tips for tight spaces. |
| Round-nose pliers | Making loops, coils, consistent curves | N/A (tapered tips) | Mark jaw positions with tape for repeatable loop sizes. |
| Flush cutters | Clean cuts, trimming wire ends | N/A (flush-cut, spring-loaded) | Cut at a slight angle and point the cut end away from you to avoid fly-offs. |
| Nylon jaw pliers | Straightening wire, work-hardening lightly | N/A (replaceable nylon jaws) | Pull wire through jaws in long strokes to straighten without scratching. |
| Polishing cloth | Final shine, removing light oxidation | N/A (jewelry polishing cloth) | Polish after forming; avoid polishing coated wire or plated finishes heavily. |
Pick the Right Gemstone Shape (So the Wrap “Clicks”)
Some stones practically teach you how to wrap them. Others fight back until you have more control. For your first wire wrapped gemstones pendant, aim for stones with natural “shoulders” that help the wire lock in place.
Beginner-friendly stones/shapes:
- Tumbled stones with a slight pinch or point
- Teardrops, ovals, and freeforms with a wider belly
- Drill-less crystals that have edges for the wire to catch (like some Smoky Quartz points)
Trick I use: place the stone on the table and gently push it. If it rocks wildly, it’ll need more stabilization (extra frame wires or a bail design that grips harder).
The Clean Wrap Formula: Frame → Spine → Bind → Bail → Finish
This is the repeatable structure behind most neat-looking wire wrapped gemstones. Think of it like building a tiny seatbelt system for your crystal.
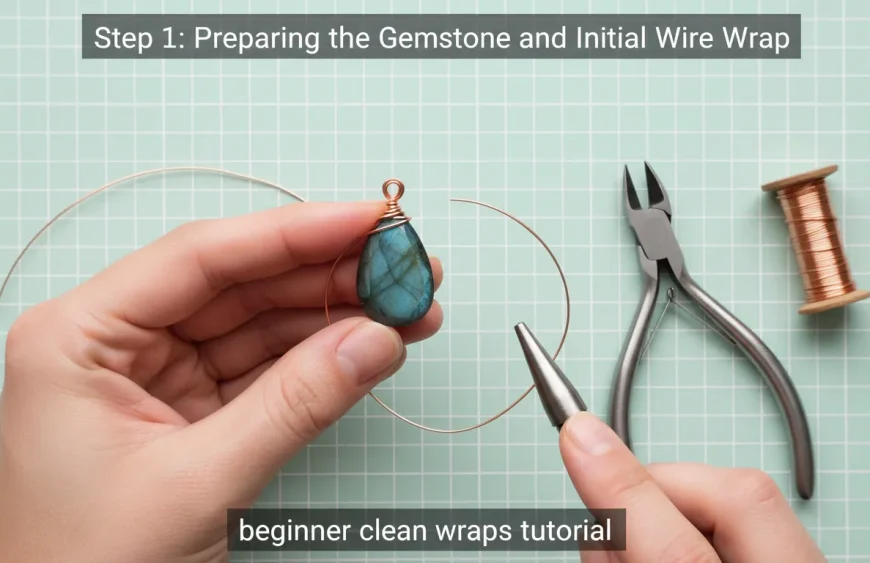
1) Prep and straighten your wires (don’t skip this)
Cut:
- 2–4 frame wires (20–22g), each about 8–12 inches depending on stone size
- 1 weaving wire (24–28g), about 2–4 feet
Straighten frame wires with nylon jaw pliers or pull them gently through a folded cloth. Straight wire = straight lines, and straight lines read as “clean craftsmanship.”
2) Make the “spine” that controls symmetry
Line up your frame wires and bind them together in the center with 6–10 tight wraps using the weaving wire. This bound section becomes your spine—the anchor that keeps both sides mirrored.
Clean-wrap rule: every bind should sit snugly beside the last. No gaps, no overlaps.
3) Seat the gemstone and lock the frame
Place the gemstone against the spine, then bend the frame wires around it like a cradle. Cross the frame wires at the back (or sides) where the stone is narrowest. This is where security comes from, not from adding “more random wraps.”
If the stone slips:
- Tighten your cross point to a narrower section
- Add a second bind under the stone’s “belly”
- Use an extra frame wire to form a subtle “V” support
4) Wrap the bail (the top loop) like it’s jewelry, not hardware
Bring the top wires together above the stone and create a loop with round-nose pliers. Then coil the remaining wire neatly down the neck 3–6 times. This is where beginners often lose the “polished” look—because coils stack unevenly.
Bail upgrade: before coiling, pinch the loop closed slightly so it looks intentional and centered.
5) Finish ends so the pendant feels smooth on skin
Trim wire ends with flush cutters, then tuck ends into the wrap using chain-nose pliers. If you can feel a sharp point with your fingertip, it will snag hair or scratch skin.
My checklist before calling it done:
- Does it sit straight from the bail?
- Are the front wraps symmetrical?
- Are all ends tucked and smooth?

Tension: The One Skill That Makes Wire Wrapped Gemstones Look Professional
In every workshop-style lesson I’ve watched and tested, “tension” is the quiet difference between handmade and high-end handmade. Your wraps should feel like snug shoelaces—firm, but not crushing.
Try this tension drill (2 minutes):
- Wrap 10 coils around a scrap wire.
- Aim for each coil to touch the next (no daylight).
- Undo and repeat until your coils look identical.
You’ll see the improvement immediately when you return to wire wrapped gemstones—especially on the bail and spine binds.
Quick Fixes: When Your Wrap Looks “Messy”
Most problems have one clean correction—not five extra wraps. Here are the fixes I use most often when a pendant starts going sideways.
- Uneven coils: unwind back 2–3 turns and rewrap slowly under tension
- Wire kinks: straighten gently with nylon jaws; if deep, replace that section
- Stone shifts: add a stabilizing bind at the narrowest point, not the widest
- Ends sticking out: trim shorter and tuck into a coil stack, not open air
Quick Tip: Easy Wire Swirls/Coils
Design Ideas: Match the Wrap Style to the Stone’s “Mood”
Wire can be minimalist or ornate, and both can look clean. At StarryBead, I’ve found that certain stones “want” certain wire personalities:
- Amethyst / Clear Quartz: clean frames, simple bails, symmetrical weaves
- Black Tourmaline: stronger frames, slightly heavier gauge for grounding presence
- Citrine / Aquamarine: airy wraps with open negative space (lets light through)
If you’re creating intention-based jewelry, keep the wrap consistent with the story: a “calm clarity” piece should look calm and clear, not chaotic.

Care Tips (So Your Wrap Stays Clean-Looking)
Even the best wire wrapped gemstones need simple care to keep their shine and shape.
- Store separately to prevent scratches and bent bails
- Wipe wire with a soft cloth after wear (skin oils dull shine)
- Avoid water/chemicals if your wire is copper or plated
- If a bail opens slightly, reshape gently with pliers—don’t yank by hand
For gemstone authenticity and safe crystal care guidance, I align with reputable mineral and gem references like GIA’s gemstone education and broader background from Encyclopaedia Britannica. For mindful wear and personal meaning, many people also explore intention-setting frameworks through resources like Greater Good Magazine (not gemstone-specific, but helpful for ritual and reflection).
Conclusion: Your Next Wrap Will Look Better Than Your First
The funny thing about wire wrapped gemstones is that the “magic” isn’t hidden—it’s visible in the symmetry, the tension, and the smooth finishing. I’ve ruined wraps by overworking them, then made cleaner pieces by doing less, but doing it with control. Pick one stone, follow the frame → spine → bind → bail formula, and keep your coils tight and deliberate. If you want, share what gemstone you’re wrapping next—and what part keeps tripping you up—and I’ll suggest a wrap style that fits.
FAQ: Wire Wrapped Gemstones (Beginner Search Questions)
1) What wire gauge is best for wire wrapped gemstones?
For most pendants, use 20–22 gauge for the frame and 24–28 gauge for weaving and binding.
2) How do I wire wrap a gemstone that has no hole?
Use a cradle wrap: create a central spine bind, then form a snug frame that crosses at the stone’s narrowest point to lock it in.
3) Why does my wire wrap look messy even when it’s tight?
Usually it’s uneven coils, inconsistent spacing, or untrimmed ends. Straightening wire and rewrapping 2–3 turns often fixes it.
4) How do I stop the gemstone from slipping out?
Add stabilization where the stone is narrow, not wide. A second bind under the belly and a tighter cross point are the fastest fixes.
5) Is copper wire okay for wire wrapped gemstone jewelry?
Yes—copper is beginner-friendly and holds shape well. Just note it can patina over time; seal or polish if you want a bright finish.
6) How long does it take to learn clean wire wrapping?
Most beginners see a big jump in 5–10 practice wraps, especially after focusing on tension and consistent coil spacing.
7) Can wire wrapped gemstones be worn every day?
They can, if ends are tucked smoothly and the frame is sturdy. Daily wear is easier with stronger frame wire (20–21g) and careful storage.